Feeds:
Posts
Comments

Archive for the ‘Primitive Crafts’ Category

Hunting is one of the few primitive activities still enjoyed by many modern humans and it is different for everyone.  Some hunters head out into the woods and blast a trophy bull elk at 300 yards, remove the head for a mount and go home satisfied.  Others have a heavy emotional experience of killing a beautiful animal so that they may live in a healthy, environmentally sustainable way.  Who can say which practice is better?  I say the latter.  Here are some ideas for using more of your animal if you, like me, want to honor the beast by getting as much as you can from its death.

IMG_0111

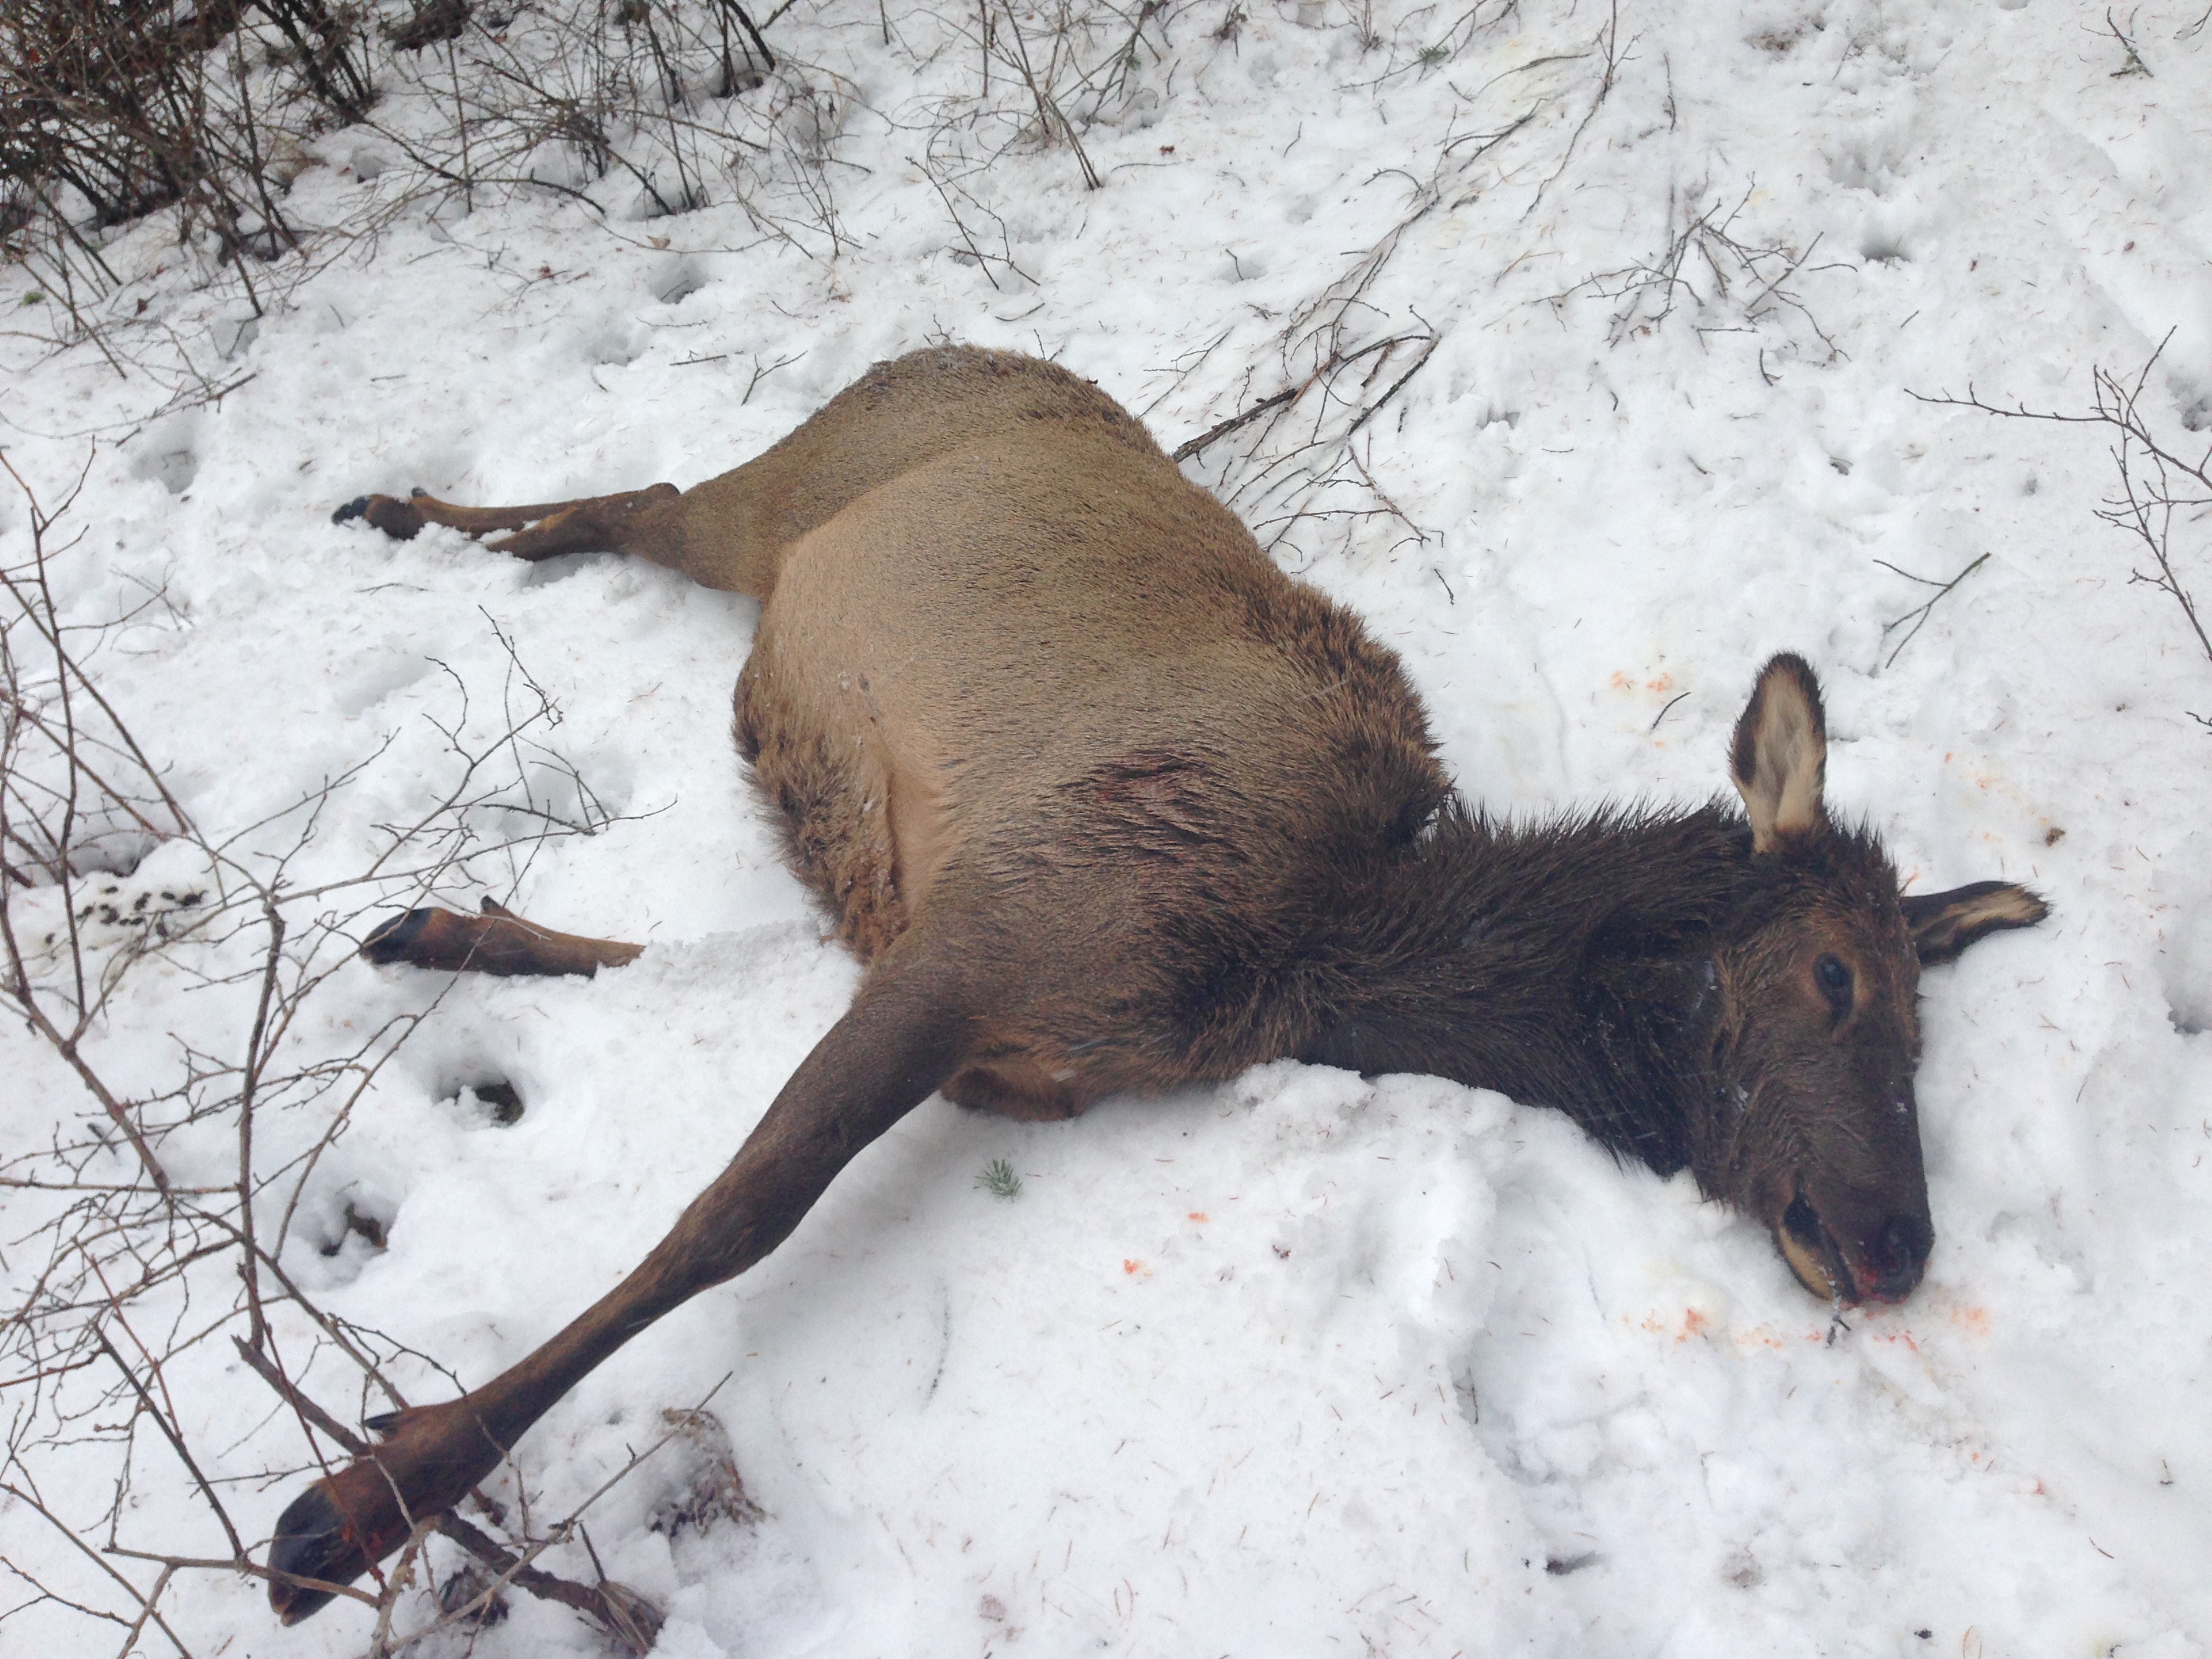
A beautiful 2 year old cow elk. In this animal lies hundreds of pounds of the healthiest meat you can’t buy at a store, nutritious fat for cooking, bone broth to boost the immune system, a hide for tanning, sinew for crafts and glue, and many other possibilities that are only limited by time and desires.


IMG_0113

Cuts of meat. I skinned and de-boned this elk in the field. It saved a lot of time on the butchering and a lot of weight hauling out. Those long strips of meat in the bottom of the picture are the tenderloins covered in sinew. All muscle groups contain sinew but these strips are the longest and easiest to process.


IMG_0169

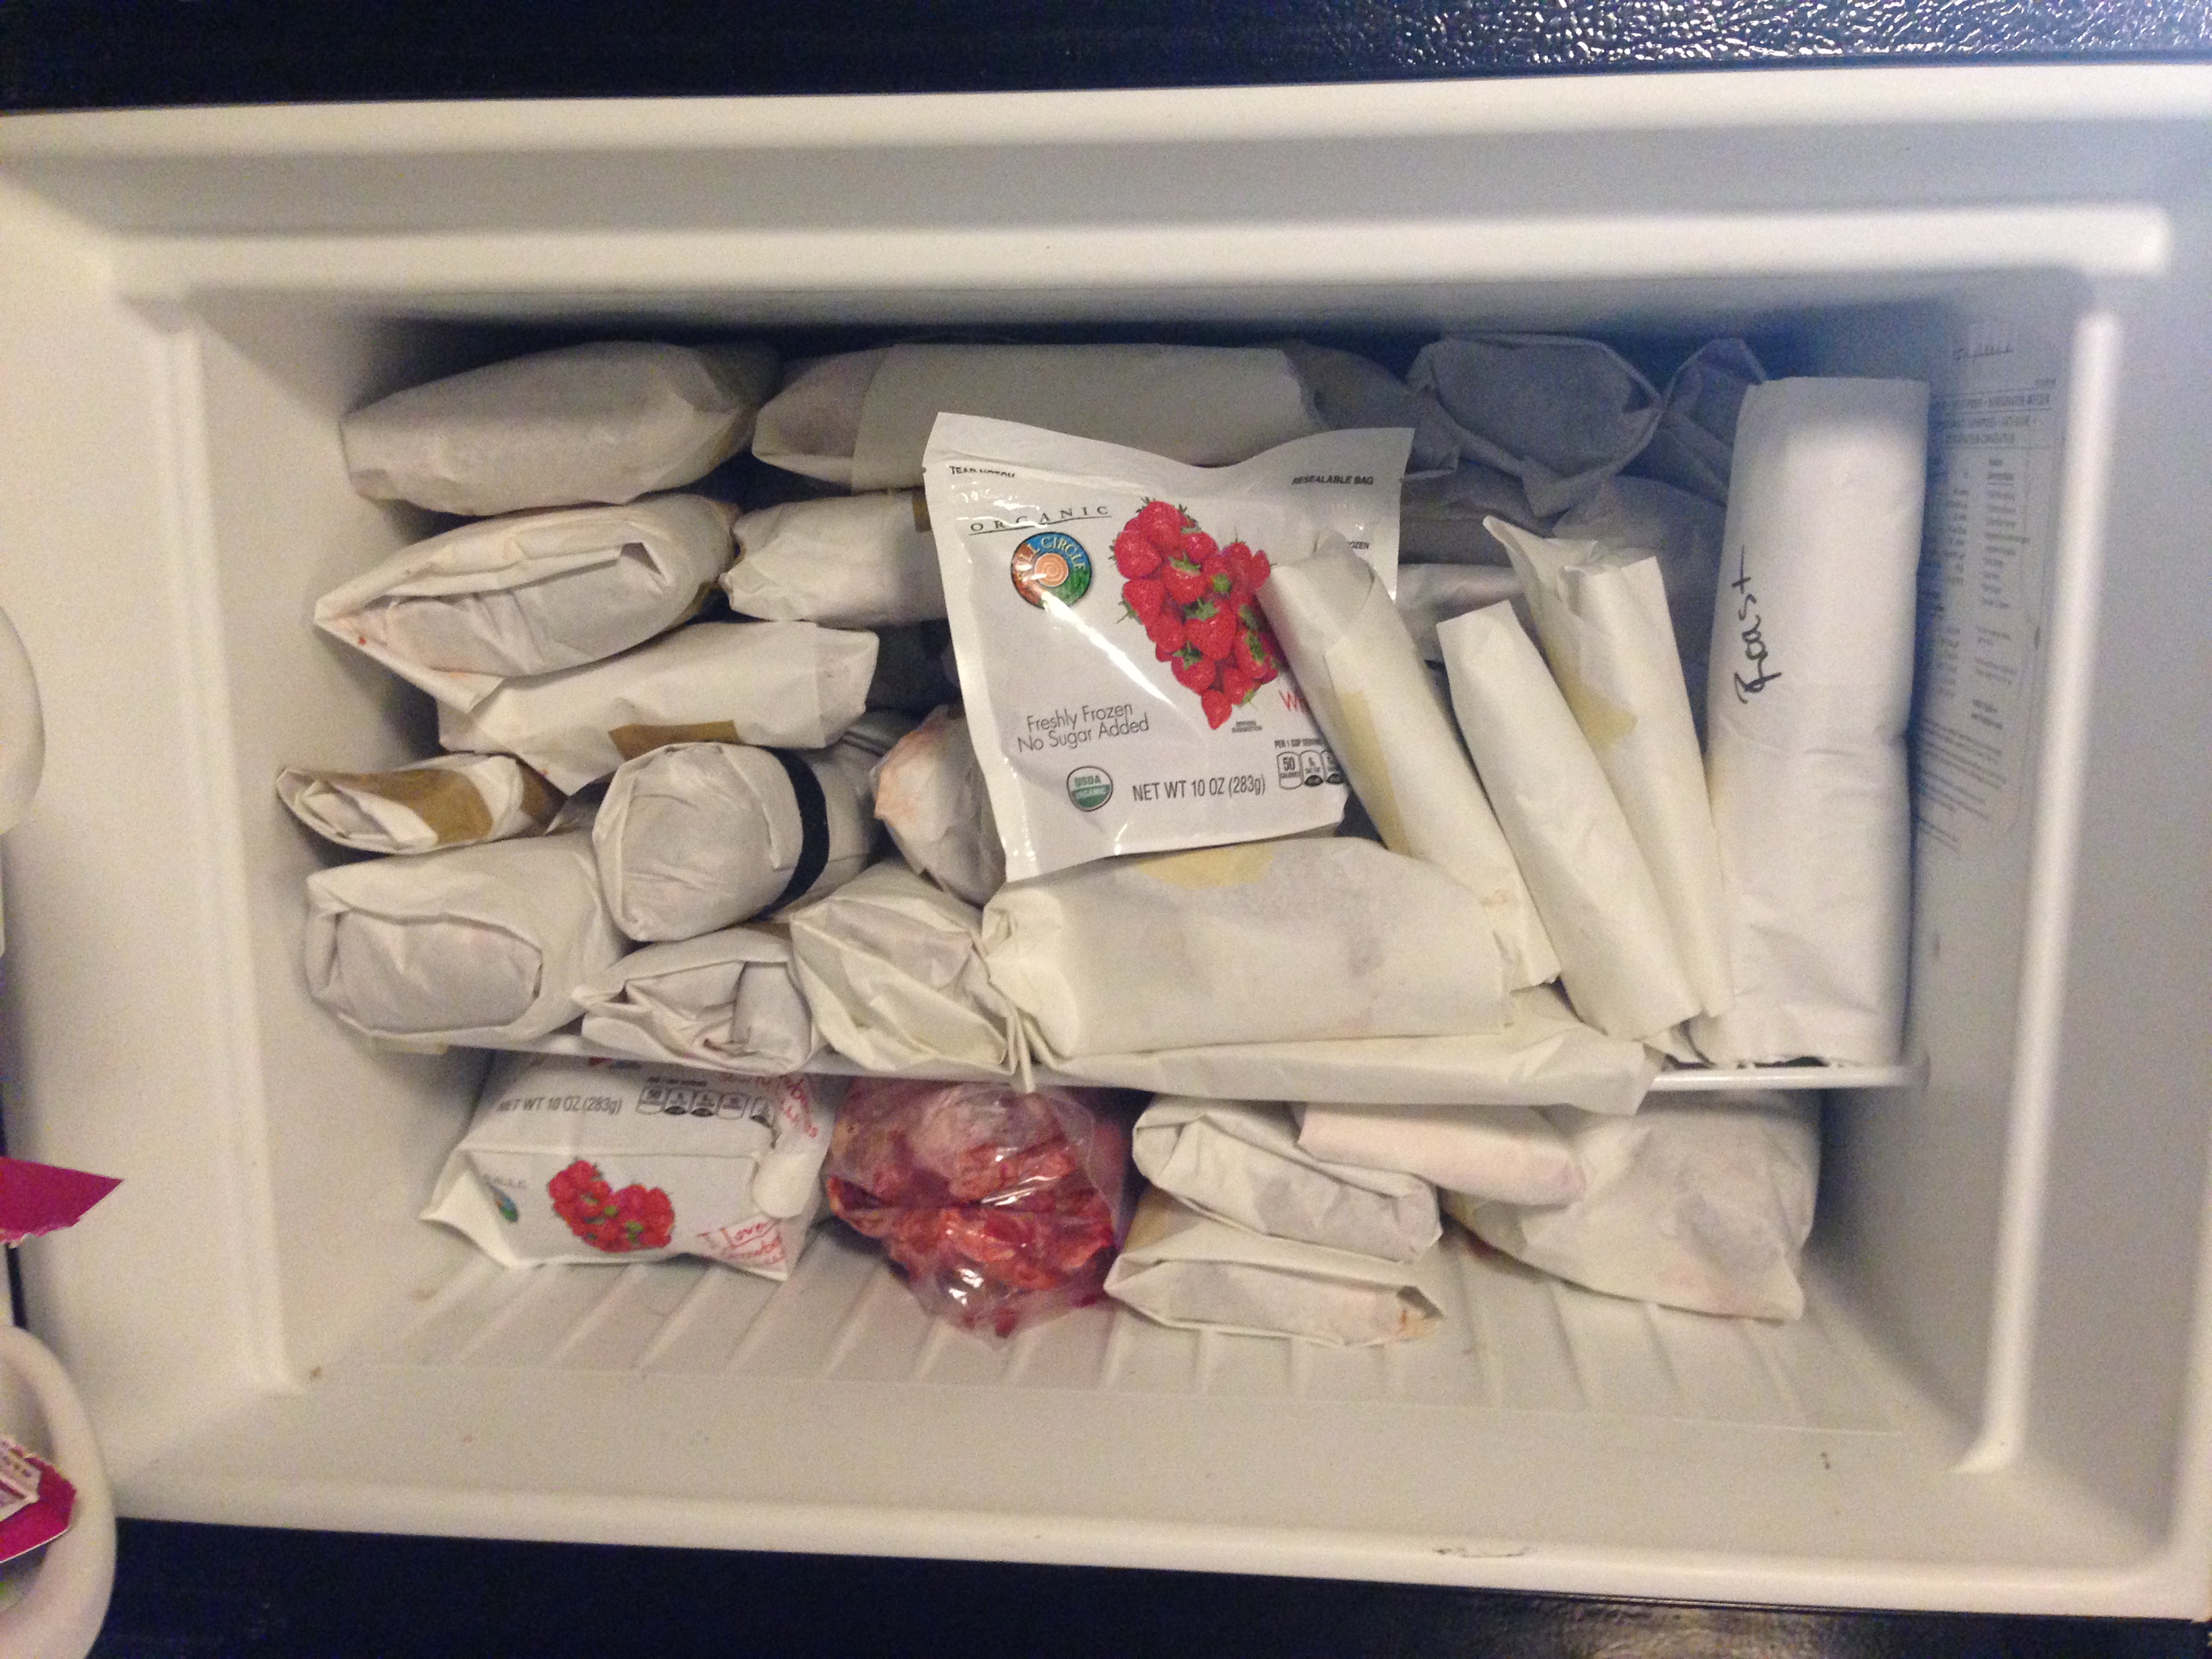
A freezer full of meat is a great feeling.  The meat can be ground up into burgers and breakfast sausage, cut for stews and steaks, or marinated and dried into jerky.

IMG_0284

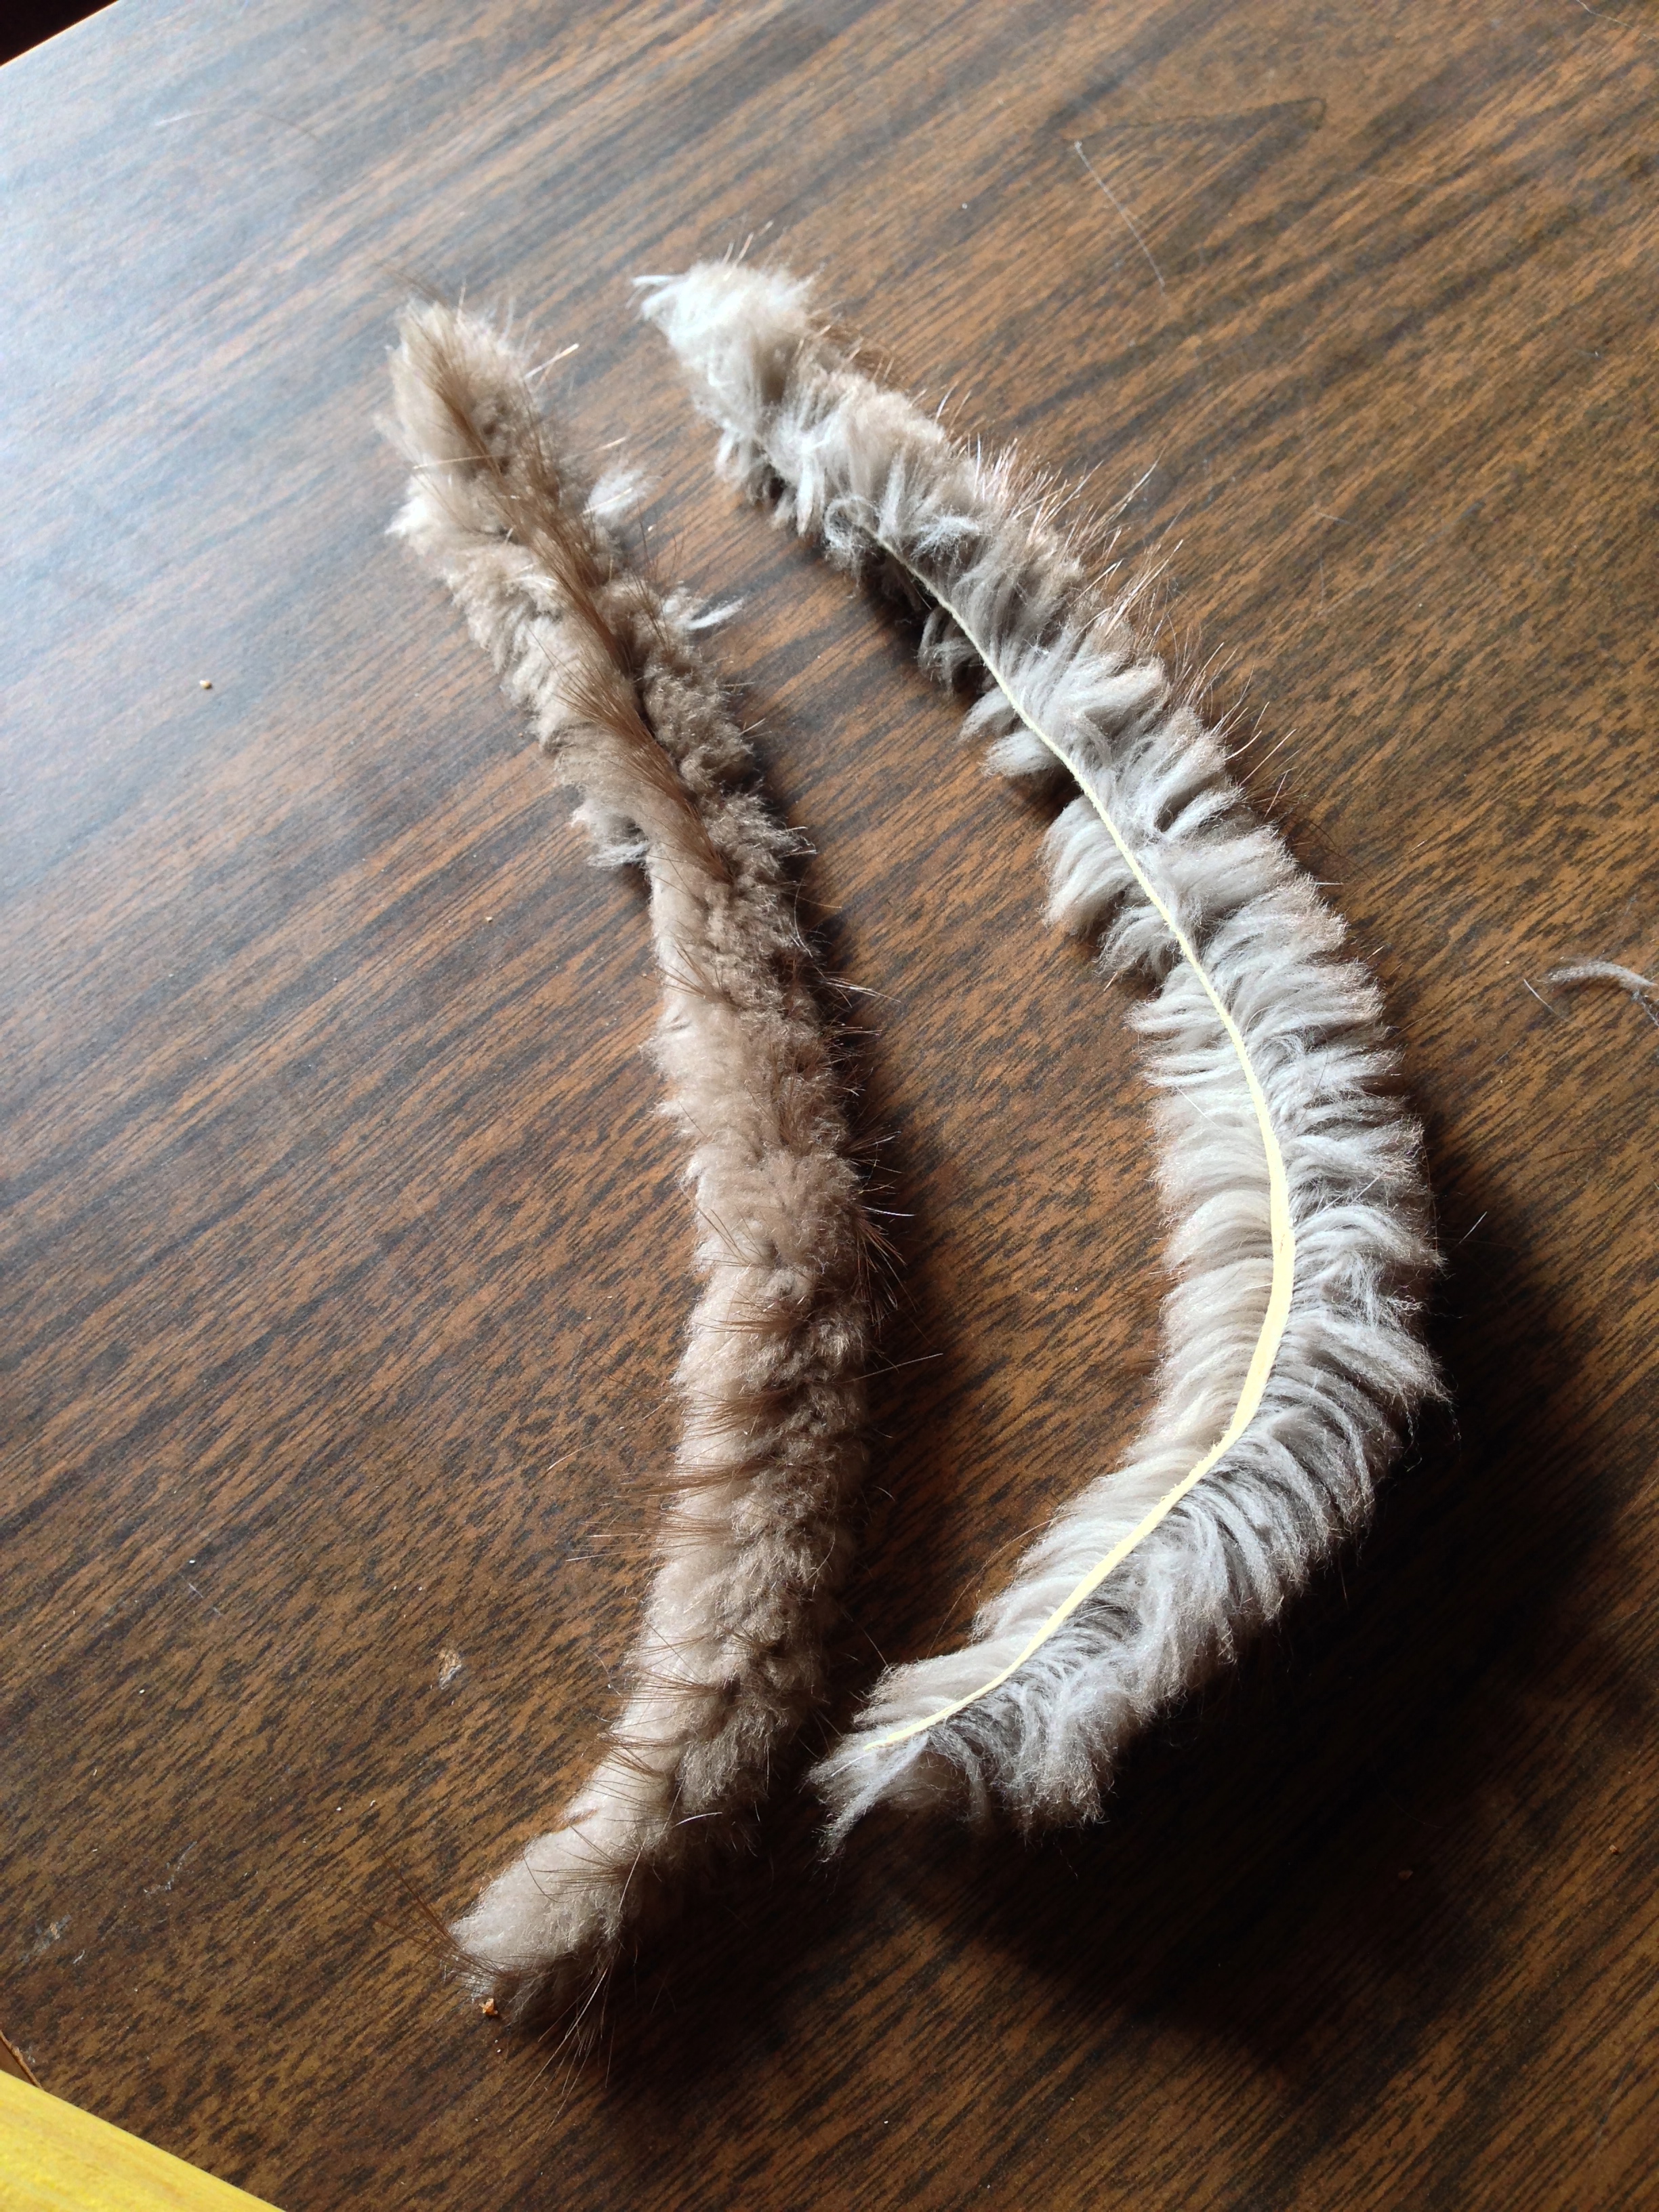
Here is what the sinew looks like after being dried and pulled apart. This is the strongest natural fiber in the world and was used by primitive people for sewing, bow strings, floss, gluing to the backs of bows to make them shoot faster, and probably many uses I’ve never heard of. I’ll use this sinew to back my bighorn horn bow. I saved the short scrappy pieces and put them in that jar to make the highest quality natural glue – also for the horn bow.

IMG_0178

Just believe me when I tell you that bone broth is worth your time. If you aren’t including it as part of your diet then take a few minutes to research the benefits to the immune system, joints and ligaments, tooth enamel etc. There are a few things that every person on earth consumed for thousands of years, for good reason, that has since been forgotten. Bone broth is one of them. Also organ meats and animal fat. I like to roast the bones for half an hour to improve flavor then add veggies.

IMG_0194

Add onions, celery, parsley and whatever else strikes your fancy then let simmer for 48 hours.

IMG_0263

Strain, jar and freeze. Use glass jars – not plastic like me. Use the broth for stews or drink it straight when you are feeling sick.

IMG_0176

You can cut any and all fatty bits off of your animal and render it to make high quality lard. Just put the chunks in a pot on top of a cast iron pan (this helps avoid burning) and simmer for several hours. You can speed up the process by cutting the fat into smaller pieces.

IMG_0204

Straining out the dried up meat bits.

IMG_0221

You’ll know when you’ve gotten out all the fat. The pieces will turn into dried up little cracklin’s.

IMG_0210

That’s all for now.  Stay tuned for hide tanning, other primitive crafts and winter tracking in beautiful Wyoming.

Read Full Post »

I finished a bow today – here are some pictures I took along the way.  Enjoy!

IMG_2558

Here is the stave. Osage tends to be snakey and twisted so finding a straight line can be challenging. All that really matters is that the tips and handle are in line.

IMG_2561

The next step is to scrape the back of the bow (the part facing away from you when shooting) down to one growth ring. The back of the bow stretches when you shoot it and if you carve through multiple growth rings it can split on that spot and the bow can explode.

IMG_7267

At this point I took a several month hiatus to allow the wood to completely dry. Osage is awesome in that it darkens with time and sun exposure. Really old osage bows are a dark orange/brown color. Now I’ll scrape off the last bits of soft wood on the back of the bow.

IMG_7270

Much better.

IMG_7274

Having scraped at different times it gives the bow this cool patterning. Maybe it will work as camo when I’m out in the woods.

IMG_7280

I use a glass jar to burnish the wood. This compresses the fibers, making it stronger and more resistant to scratches, dents and humidity.

IMG_7778

Now comes the tillering process. The bow needs to bend evenly so that no weak spots form. As you can see the bow is very uneven to start with which made it a real challenge to tiller.

IMG_7261

The area that looks like a hinge is actually much thicker than the other limb. I was hoping that as the bow is drawn farther it would look more even.

IMG_7775

Much more even although still a little odd looking. A great trick for never over straining the wood – I put this whole set up on a scale and pulled the string down – never drawing it past 60 pounds. I would scrape and lighten up the bow and go another notch further down the tillering stick as the weight of the draw became lighter.

IMG_7594

I’ll use a knife held at a right angle to scrape off the rasp marks and do the final tillering.

IMG_7828

Now to clean up the handle.

IMG_7846

Getting better, just needs oiling.

IMG_7851

I don’t want the wood to absorb any moisture so I’ll rub bear fat on the entire bow and repeat this several times over the next few days and a couple times a year thereafter.

IMG_7857

Much nicer.

IMG_7798

Now I’ll make an arrow shelf out of some buckskin. Giving the arrow an exact spot to shoot off of every time improves accuracy.

IMG_7803

Contact cement works well for this.

IMG_7865

Now I’ll wrap the whole thing with a piece of buckskin.

IMG_7881

Good enough for me.

IMG_7903

Since I’ll be hunting with this bow I want it to shoot as quietly as possible. String silencers will help with this and beaver fur is perfect for it.  (Note: I didn’t trap this beaver – I had to buy a beaver pelt for work at the local mountain man festival so I got one for myself too!)

IMG_7907

I’ll cut a couple narrow strips from the side of the pelt.

IMG_7911

Creating a separation in the string. Putting on the silencers works best when the bow is strung – the tension helps it wrap tightly.

IMG_7916

Sneak one end of the fur in there.

IMG_7918

Then just wrap it around, being careful to pull back the fur as you wrap it so that it doesn’t get stuck under the wrapping.

IMG_7922

I’ll do one more lower on the bow and it’ll be done!

IMG_7925

The finished bow! I’m very happy with how it came out. It shoots fast and surprisingly quiet. The draw is about 65 pounds – a little heavier than I want so I’ll shoot it for a while and see if it comes down, then I’ll check the tiller and lighten it up if I need to. Thanks for reading!

Read Full Post »

Oregon obsidian

Read Full Post »

Friday, August 24, 2012

I’m sitting here looking west into the mountains.  The sun is warming my back and my belly is full of bison, brook saxafrage, wild rice, wild boar fat and salt.  Over those hills is where my new life will be in just two weeks.  I’m glad I don’t have to walk there, although it would be a great adventure.  I wonder how often Mom and Dad think about me.  They probably try to picture me in the mountains or sitting by a fire at night.  Maybe they are inspired by the thought and they go outside and take in a deep breath of fresh late summer air.  A golden eagle just flew right over my head at maybe 40 yards.  The marmots and ground squirrels alarmed.  The bird flew over the ridge and I can hear alarming marmots miles away.  Amazing!

Caught shootin’

Saturday, August 25, 2012

We got fresh meat yesterday so we had it for breakfast today.  It was so good.  Very tender being cooked all night.  Fatty and filling.  Last night was rough.  I was uncomfortable and pretty cold all night.  It looked like it could have rained and that scared me because we would have been totally screwed.  Today we built shelters and that was fun.  We didn’t finish ours but I think it will still be way warmer as it is.  Last night was the first time I thought about leaving.  Not cause I wanted to but cause I was cold all day and under dressed and cold all night.  I don’t want to just freeze for the rest of this.  I put my moccasins on today and I have a hat and head wrap I can wear too.  Anyway, I feel great today – especially because of the shelter and I think I’ll last the rest of the time.  Time to get back to hunting tomorrow.  Maybe I’ll journey to the hidden lakes.

Miles looking noble.

Sunday, August 26, 2012

A great night’s sleep in the new shelter and a beautiful morning with the sun warming my back, looking west into endless mountain peaks.  I think my toe is healing but its slow going.  What adventures will today behold?  I want to walk.  I’ll take my bow and walk far down the valley.  I also want to see the hidden lakes.  I may not have time for both.  Maybe I’ll see the lakes tomorrow.  Maybe first I’ll go up the ridge and see the view.  I love how much time we have out here.  I always feel unsatisfied by short camping trips.  A month is a good length of time.  I like having a big group of people too.  I should finish up the shelter today.  But first, I’ll have breakfast.  Neil’s cooking.  Acorns, fish, seaweed and greens.  Maybe a little lamb’s quarter flour.  Last night we raged on bay nuts up at the evening fire pit.

Our warm and cozy shelter.

Read Full Post »

I spent the summer wandering through the mountains barefoot with my bow.  It was a magical time.  I’ve only been back in the modern world for a day now and I already feel like the past month might have been a dream that never really happened.  It is such a different world in the wilderness where there are so few things to distract you from the present moment.  The only real distractions are thoughts.  But I found that after a short time, I grew completely bored of my own thoughts which fully liberated me to the moment at hand.  We lived without any modern gear of any kind.  We wore deer skins for clothing, slept in buffalo robes, cooked in clay pots, fished with bone hooks and plant fiber line, hunted with bows and arrows with stone tips.  Everything we made by hand throughout the summer.  The beautiful thing about living using only things you’ve made is that if anything breaks, you can just fix it.  That feeling of freedom doesn’t exist in my modern life.

There were many great moments and many adventures.  I’ll try to share some of them with you as time goes on.  It is hard to know where to start.  Its confusing jumping between universes so quickly.  Leaping from the stone age to the modern world in just an afternoon.  We did in fact bring a camera – I’ll add more pictures when I can.

Read Full Post »

Fish hooks

Fish hooks of bone and barrel cactus spines

Check out this wolf spider eating a moth

Read Full Post »

Rafting adventure

Nice buck

Bear claw marks on an aspen

Rawhide pouch

Buckskin shirt

Clay cooking pot (unfired)

All my failures of late…

I’m having a great summer in Twisp so far.  Beautiful landscape.  Lots of animals.  Making a lot of things and learning a lot.  Only a few more weeks of classes then two weeks that are open to finish up our preparations before the primitive trip.  We are tanning buffalo hides next week.  Should be a good time!

Read Full Post »

I am on the road headed for Twisp where I’ll spend my summer living primitively.  Most of my preparations are complete and it was a long time coming.  I am excited after this summer to have a full set of primitive living gear.  Imagine everything you would need to go backpacking all summer… well that’s basically what you need to live primitively – clothing (buckskin), sleeping bag and ground pad (bison hide w/hair on), cooking pot (clay pot), matches (bow-drill), dehydrated food (acorn flour and deer jerky), backpack (pack basket), water bottle (gourd), boots (moccasins), knife (stone knife) and so on.  I’ll also have primitive fishing gear and a bow with arrows.  What about a tent?  We will just build shelters as needed.  From what I hear it rains far less in eastern Washington than in the west.  Wish me luck on the rest of my trip…. Oregon was beautiful but I didn’t do a very good job at taking pics.  I’ll try to do better the next few days.

It took many hours and help from good friends to turn 40 pounds of acorns into 8 pounds of dried food.

Some natural tool flint knapping practice. Working on antler punch notching and antler ishi stick pressure flaking.

8 tanned deer skins, one tanned elk skin, one partly softened moose skin, several rawhide deer skins. Lots of work!

Read Full Post »

I made an adz today.  Check it out:

A stick and a stone.

I need to cut a few inches off for the all the angles to be right.

I scored the line with a sharp flint knife.

I used my celt to chop it to size.

Now I’ll use an antler chisel to cut a platform for the stone.

First I cut the notch, then I split off the wood.

I’ll use the flint blade to rasp the platform flat and smooth.

I’ll use a strip of deerskin for the lashing. To make a rawhide string strong, you have to soak it, twist it and then make the lashing while it’s still twisted.

When the hide isn’t twisted, it is a flat weird shaped piece of skin with no strength. Twisting it makes all the difference.

The adz works great! Here is an abo boomerang I’m making. The angle of the adz allows me to shape wood much easier than just with an ax or antler chisels.

Read Full Post »

I received one of the best Christmas presents ever this year – a moose antler!  I’ve been wanting a moose antler for years so this was very exciting for me.  There are some stages of flint knapping larger stones that are hard to do with a hammerstone or a small deer antler (at least for me).  Having a large moose antler opens up a whole new world of knapping for me.

Most knappers use a rasp and grinding wheel to make their antlers smooth for knapping but I am fascinated by the obscure details of primitive processing that indigenous people used before metal tools so I wanted to see how processing this antler would go using only “abo” techniques.

As you can see, raw moose antlers are rough and bumpy. To make a good knapping tool I'll need to smooth it out. Unfortunately this antler was already sawed off but the techniques I'll use would work just as well if it was whole.

This is the working end and it needs to be ground smooth.

By "pecking" with a small flint stone I was able to smash down some of the bumps.

On the left side here you can see how the bumps were smashed down using the flint stone. After pecking, I ground them smooth on the sandstone slab.

Here you can see how the bumps start to smooth out after grinding.

I'm going to use fire to help shape the larger bumps.

I have to be careful not to burn the antler too much because it becomes very brittle.

When the antler is charred, the pecking becomes much more effective.

Now it is time to shape the handle. I need to take a lot of the weight off of the back of this antler so the balance is more towards the working end.

I coated the lower part of the handle with clay to protect it from the heat.

If I could do it over again I would have tried to keep the handle longer. Live and learn.

When the antler is burnt it basically falls apart and you can hit it on a rock to flake off all the burnt parts.

Now I'm going to peck away the brittle parts and grind the handle smooth.

If you just grind an antler on a stone, the stone will quickly become inundated with bits of antler and it won't grind very well. The solution is sand.

Adding sand keeps the stone gritty and basically creates a giant solid peice of sand paper.

Much smoother.

Some further smoothing on the working end. As I use this antler billet I will regrind it periodically and it will take on a much more uniform shape.

The finished antler.

It works!

Read Full Post »

Older Posts »